Welcome to Moda Fabrics!
Jane's Ladder Quilt
Jane's Ladder Quilt
Hello! My name is Allison Jensen of Woodberry Way and I'm excited to be back in the Bake Shop today with an easy quilt pattern. This one uses Charm squares for a crib quilt, or a Layer Cake for a throw, and is a fun spin on the traditional "Jacob's Ladder" block.
Crib Size (48" x 56")
2 Charm Packs {Nest by Lella Boutique}
2 Charm Packs background fabric {Moda Bella solid 98}
3 yards backing fabric
1/2 yards binding fabric
Throw Size (64" x 80")
1 Layer Cake print fabric
1 Layer Cake background fabric
5 yards backing fabric
5/8 yards binding fabric
Crib Size (48” x 56”)
Step 1: Using 1 print Charm Pack, and 1 background Charm Pack, create HSTs. Place 1 print square RST with 1 background square. Mark a line diagonally on the back side, and sew a scant 1/4” away from the line on each side. Cut along the line and press open. Trim to 4.5”. Make 84 HSTs, 2 from each of the 42 prints.
Step 2: Using 1 print Charm Pack and 1 background Charm Pack, create four-patches. Place 1 print square RST with 1 background square. Sew along two opposite edges of the squares with a 1/4” seam. Then cut the piece in half both directions (at the 2.5” mark). Press all pieces toward the print, and sew together with an alternating piece, creating a 4.5” 4-patch. Press center seam open, or whichever direction you'd like, it won’t matter here. Make 84 four-patches, 2 from each of the 42 prints.
NOTE: If you are particular about directional prints, as I usually am, you will need to decide beforehand which of your prints are going to be “A” blocks, and which are going to be “B”, as the four-patches will be oriented in opposite directions.For the HSTs, make sure you're sewing an upward line from left to right. I laid my HSTs out on the design board first in my desired color arrangement, and then when I got to a print that was directional (usually very few of them), I looked at that print on the design board to determine which way the four-patch needed to be oriented before sewing them together. If directional prints cause you no distress, carry on and disregard this portion!
Step 3: Match all the HSTs and four-patches together with their corresponding prints. Each block will need 2 HSTs and 2 four patches, all of the same print.
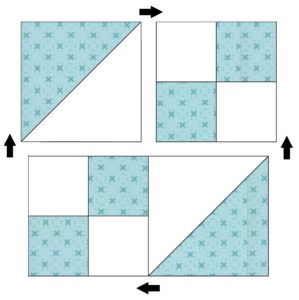
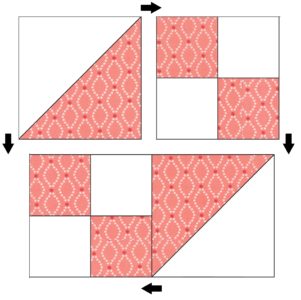
Divide the prints in half and make 21 “A” blocks and 21 “B” blocks as shown below. The HSTs and four patches are oriented oppositely for A and B blocks. For each block, first sew the top and bottom portions together, and press in direction of the arrows. Then sew the two rows together, and press the center seam in the direction of those arrows. Following the arrows will ensure nicely nesting seams and matching points.
Block A-
Block B-
Step 4: Sew the A blocks and B blocks alternately in a 6 by 7 grid. Press rows alternating directions.
Row 1- A, B, A, B, A, B
Row 2- B, A, B, A, B, A
Row 3- A, B, A, B, A, B
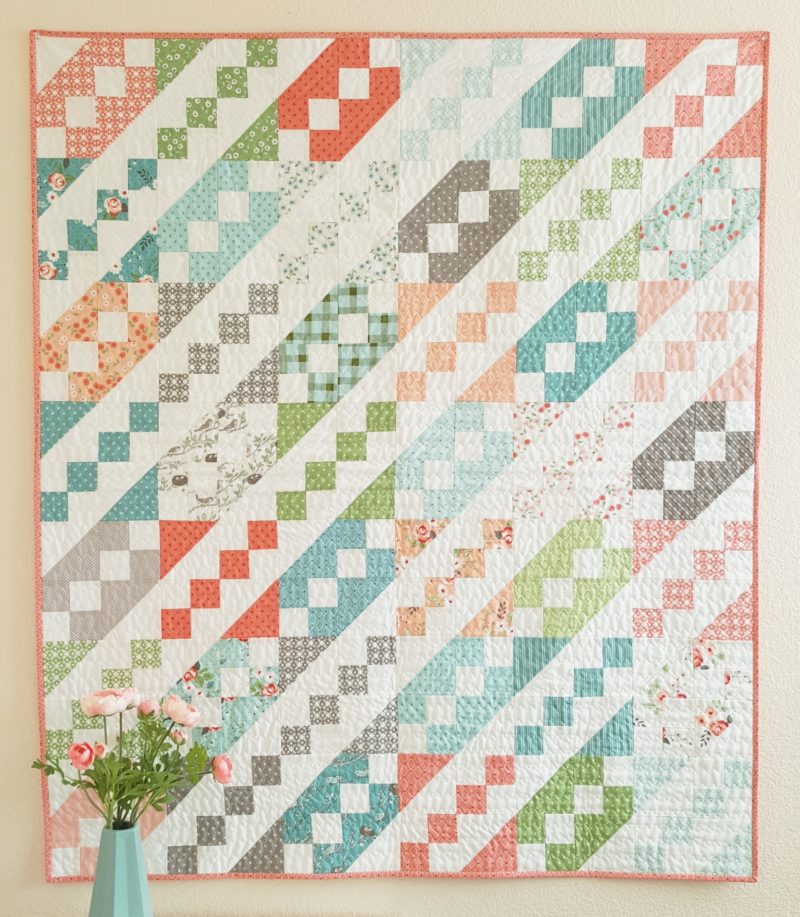
Etc., for 7 rows. Press rows and voila! You have a beautiful, fast, easy quilt top. Back, baste, quilt and bind as desired.
Full disclosure statement! Often when using precuts, such as in this case, I find there are a couple of prints that are so low volume, they won't really show up at all against the background fabric. When this happens, a few of the blocks look "blank" when looking at the quilt as a whole. Some people like the variation, it's a matter of personal preference. Since I don't like it, I set them aside in my LV collection and substitute them with something else a little darker. In this case I took out 5 of the lightest whites and replaced them with coordinating colors and prints. Some are from other Lella Boutique lines and some are blenders or basics from other designers. If you noticed the imposter prints, you have a very keen eye!
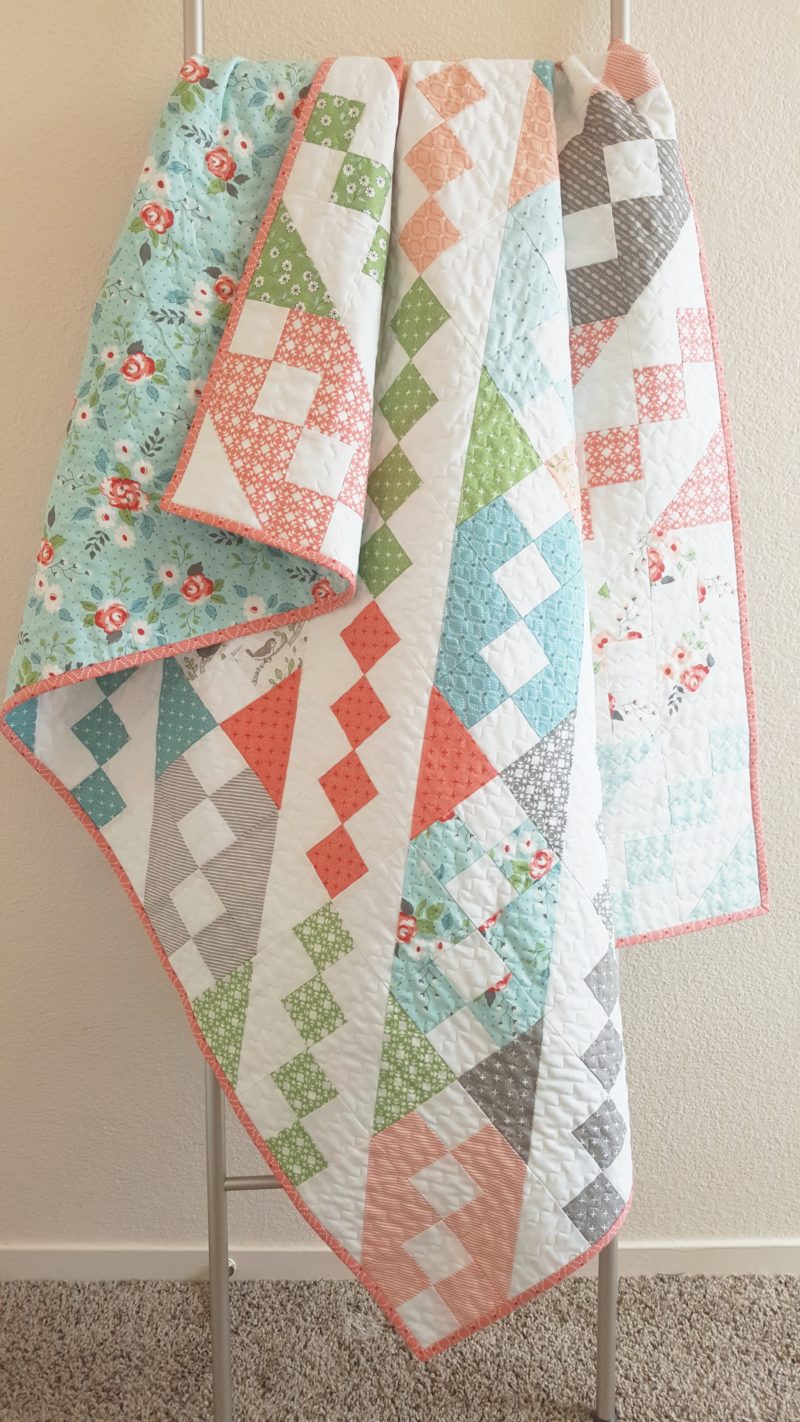
I quilted mine with a wavy zig zag on my Husqvarna Opal 650 (stitch 2/5) and a walking foot.
Throw Size Directions (64” x 80”)-
Cut Layer Cakes into (4) 5" squares each.
Step 1: Using 2 print 5" squares, and 2 background 5" squares, create HSTs. Place 1 print square RST with 1 background square. Mark a line diagonally on the back side, and sew a scant 1/4” away from the line on each side. Cut along the line and press open. Trim to 4.5”. Make 160 HSTs, 4 from each of the 40 prints. (You will be omitting 2 prints from the quilt.)
Step 2: Using 2 print 5" squares, and 2 background 5" squares, create four-patches. Place 1 print square RST with 1 background square. Sew along two opposite edges of the squares with a 1/4” seam. Then cut the piece in half both directions (at the 2.5” mark). Press all pieces toward the print, and sew together with an alternating piece, creating a 4.5” 4-patch. Press center seam open, or whichever direction you'd like, it won’t matter here. Make 160 four-patches, 4 from each of the 40 prints.
NOTE: If you are particular about directional prints, as I usually am, you will need to decide beforehand which of your prints are going to be “A” blocks, and which are going to be “B”, as the four-patches will be oriented in opposite directions. I laid my HSTs out on the design board first in my desired colored arrangement, and then when I got to a print that was directional (usually very few of them), I looked at that print on the design board to determine which way the four-patch needed to be oriented before sewing it together. If directional prints cause you no distress, carry on and disregard this portion!
Step 3: Match all the HSTs and four-patches together with their corresponding prints. Each block will need 2 HSTs and 2 four patches, all of the same print. For this size, you will be able to make 2 blocks from each print.
Divide the prints in half and make 40 “A” blocks and 40 “B” blocks as shown below. The HSTs and four patches are oriented oppositely for A and B blocks. For each block, first sew the top and bottom portions together, and press in direction of the arrows. Then sew the two rows together, and press the center seam in the direction of those arrows. Following the arrows will ensure nicely nesting seams and matching points.
Block A-
Block B-
Step 4: Sew the A block and B blocks alternately in an 8 by 10 grid. Press rows alternating directions.
Row 1- A, B, A, B, A, B, A, B
Row 2- B, A, B, A, B, A, B, A
Row 3- A, B, A, B, A, B, A, B
Etc., for 10 rows. Press rows and voila! Back, baste, quilt and bind as desired.
(This mockup for the throw size was done in various Fig Tree and Co. fabrics.)
The crib quilt (like mine) finishes at 48" x 56", and the throw would be 64" x 80".
Thanks for visiting today. Be sure to visit me on Instagram where I looooove to share and talk about quilts! You can also stop by my blog to find out why I love "Nest" so, so much.
Allison Jensen
Woodberry Way


Comments